Friday, 15 April 2011

My design process (such as it is)

Various patterns are in various stages of testing:
  • Pie Crust Shawl -  being tested 
  • Waterhouse fingerless mitts - awaiting revisions and tech editing
  • Tortile beaded hat - awaiting revisions and tech editing
Although the testing period for the mitts and hat ended on April 10th I've been very busy at work and personally with the shock of my Dad having a heart attack midweek so for obvious reasons I've had to put these on hold temporarily. That doesn't stop me thinking ' what next?' whilst on the bus to the hospital or sketching out possible designs whilst sitting with my Mum so I thought I'd try to map out my design process over a few blog posts given that I won't have much time for actual knitting and designing.

1. Inspiration:
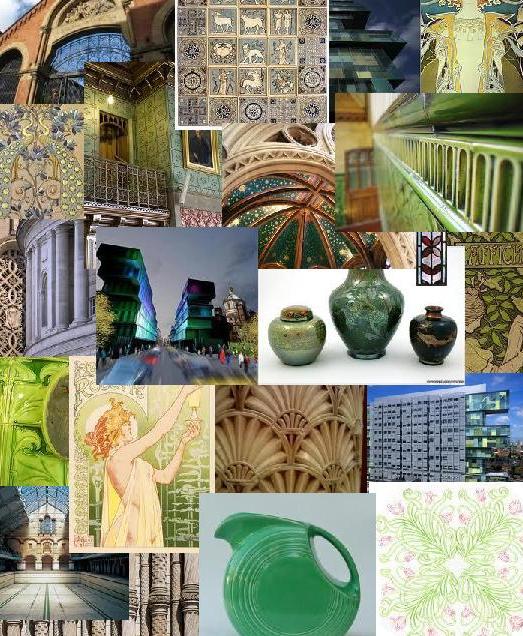
I get inspired by lots of things: interesting colours, shapes in nature or architecture, textures and patterns. I'm rarely inspired by existing patterns or by things I see in shops - I don't seem to have the urge to recreate or reverse engineer things. A while ago I started working with the lovely Jo of Dodoknitz who has recently started an online business dyeing yarn. I had a very vague idea for a circular shawl incorporating lace and cables and I knew I wanted it to be green. Not just any green but a vivid late Victorian green - somewhere between 'yallery-greenery' and acid green. So this is what I sent Jo:

As well as the colours you'll see some hints as to the textures I'm going for in the design,  particularly the twisted lattice columns and the fan detail. Given that I'm planning a design with lots of texture I wanted a yarn that would give good stitch definition and would block well for lace. So working with Jo I settled on a heavy laceweight (a new base from Tall Yarns) in a silk/ merino blend. And this is what Jo sent me:

which is just lovely. Now because I am considering a cabled, knitted on border which will just eat yarn I decided I needed two skeins so Jo dyed two more for me (so it would be the same dye lot) and they are even more vibrant:


My pictures don't do them justice, they are wonderfully, virulently green.

So now I have yarn, a general idea and some rough sketches so I need to start plotting out the detail and DOING MATHS which will take quite a while. Updates to follow at a later date

Wednesday, 13 April 2011

FO: Pie Crust (working title)

As I mentioned in my previous post I have been working on a new shawl pattern. This has been half written up for ages but it took me forever to get round to knitting a sample. I started out with the yarn in the previous post which was pale yellow, cream and a golden brown inspired by the colours of apple pie but it was too variegated for the pattern. Once I finished the shawl I overdyed it with green and blue Landscape dyes and then blocked it.

The shawl pattern will go out for testing soon but in the meantime here are some tasters:

Sunday, 10 April 2011

Tutorial - starting a shawl with a garter tab

When I first started knitting shawls this was one of the things that flummoxed me. Why would you faff about with knitting a tiny garter stitch rectangle and picking up stitches (my pet hate) when you can just cast on the right amount to start with? Well I asked on Ravelry and was told that it creates a neater and more flexible long edge on shawls knit from the centre neck outwards. Meh, thought I - bet it doesn't. Two versions of "198 yards of Heaven" later and I was converted.

Recently someone asked the same question in one of my Ravelry groups and I was able to give the same answer I was given all that time ago. As I was about to start knitting up a new shawl design I also took some photos to create a tutorial and here it is:

1. I'm using a 2 stitch garter edge on this shawl so I've cast on two stitches:


2. I need to end up with 13 stitches so knowing I have two stitches cast on (and therefore will have two stitches at each end of the garter tab) I need to knit 18 rows, giving me 9 garter ridges:


3. Now I have a long thin rectangle so I knit the two stitches, then start to pick up stitches down the long side of the rectangle:


4. Once I've picked up one stitch per garter ridge I will have 11 stitches on the needle and just need to get two more. My knitting looks like this:


5. And now I just need to get my last two stitches which I get from picking up two stitches from my cast on edge:


6. Now this looks a little awkward but I have my 13 stitches on the needles and a lovely flexible edge which allows me to start knitting my shawl. This particular pattern is based loosely on the Pi Shawl model so I am increasing on row 3, row 7 and row 15 to start with which starts to create a curved, almost semi-circular shape:


I have now finished the shawl and the yarn/pattern combination hasn't worked so I've overdyed it with green and blue to create a deep turquoise with some inky pools.Finished object photos to follow but here's a picture of the shawl blocking:

Thursday, 17 March 2011

Colourwork experiment

So I've always been a bit afeared of stranded colourwork - too many threads and needles and with floats and tension to worry about it always seemed like a lot of trouble. But still it's important to learn new things and I wanted to do a design based on the tiles inside Manchester Town Hall which are in a two colour stepped chevron pattern. Whilst the pattern doesn't match up to the tiles in quite the way I wanted (insufficient steps) I quite like the end result.

And the inside isn't too bad either

These fingerless mittens are knit on 2.75mm needles with King Cole Merino Blend 4ply in French Navy and Aran shades.

I will write this pattern up when I get the chance and I think it will be in three sizes (small, medium and large). These mittens fit my paws snugly and will be the medium size.

Sunday, 13 March 2011

Finally some photos and New Hair

No blogging for a while but lots of knitting. I finally got my husband to take some decent pictures last weekend but he only downloaded them yesterday.

Here is the beaded hat from my earlier hat blocking post:


And here is a 4ply version of Featherweight with a rolled collar pinned with a shawl pin. This has already become a new favourite (and I've started a third featherweight in 3ply)


And yes I know I stand badly but look - New Hair!

Friday, 18 February 2011

New hat pattern

As you might notice I have a new free download pattern available on Ravelry - my Rylands Cabled Hat (click on the project number in the side bar and it will take you to the Ravelry page although you might need to login)

This has taken longer than expected to release for various reasons, not least that I got distracted knitting another Featherweight Cardie which I may have said was an extremely boring knit when I made my first one. This second one is in a lovely duck egg blue cashmere merino 4ply so it's going a lot more quickly. I have most of one sleeve and the collar left to do and then I'll share some photos.

I have also been in discussions with Jo, the creative person behind Dodoknitz yarns. She's going to design a colourway for me for a new circular shawl pattern I've been thinking about for the last couple of months. It will be inspired by some of the lovely architectural details in Manchester and will be a mixture of openwork and fine cables with a knitted on border.

That being said I have a semi-circular shawl pattern that I've been meaning to knit and write up for ages and I also now have the yarn for that. Choices, choices...

Thursday, 3 February 2011

Blocking a hat

I have been very bad at blogging but I have been thinking about it and taking photos, just not actually writing any posts.

I've been knitting hats recently which is a little odd and I'm not really a hat person. The cabled hat is in the final stages of testing and will be released shortly as a free Ravelry download and when writing up the pattern I got to thinking about blocking. Rylands was blocked over a large dinner plate balanced on a jam jar (not elegant) and something I learnt from posts on Ravelry. I thought it might be useful to blog the blocking process for a hat here:


A finished hat - a bit scrunchy with the yarnovers not that obvious

 The hat has now been soaked and stretched over the lid of a cake tin (other round flat things work well too). A strand of yarn has been threaded through the ribbing like a drawstring

 Here the drawstring has been tightened up to make sure the ribbing stays reasonably tight and the simple lace is stretched out properly
This is the top of the hat after being stretched over the cake tin lid and once the drawstring has been tightened

To allow air to circulate here is the blocking hat balanced on a jar (and in the background our new fence) and looking like a flying saucer

Here is the finished blocked hat. The stitches have evened out and the open yarnover spiral is clearer. The columns of knit stitch stand out better and it generally looks neater

And the final inside shot. The ribbing is neater and still tight and the beaded yarnovers really stand out.

Modelled shots to come...